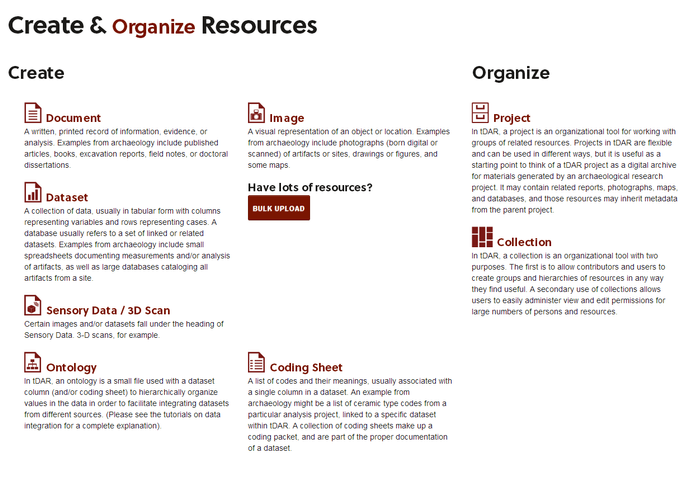
Creating or Editing a Data Set
- Former user (Deleted)
- Former user (Deleted)
- Former user (Deleted)
- Former user (Deleted)
What is a Data Set?
What types of data sets does tDAR accept?
tDAR will accept data sets stored in a variety of file formats. The data set formats that tDAR accepts are as follows:
- mdb
- xls
- xlsx
- mdbx
- tab
- csv
- accdb
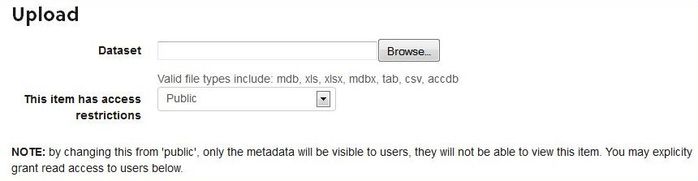
To remind you which data set formats tDAR will accept, there is a list of valid file types in the "Upload" section of the "Register a New Dataset with tDAR" page. See "Uploading Your Dataset" below.
Creating a Data set
You must first create a new information resource to ingest a data set into tDAR.
To create a new information resource, you can use the "Upload" button on the tDAR toolbar (You are able to access this toolbar and button on any page within tDAR).

You can also navigate to a project display page (from your Information Resources page). The project display page contains a toolbar that allows you to add resources associated with the selected project. Click the "add new resource to project" button on the project toolbar.

You will then be presented with a screen that asks you to select the resource type you wish to add. Choose "Dataset" from the options presented.
If you choose to use the "Upload" button to create a data set, you must first select the project with which your data set is associated. Select the appropriate project from the drop-down menu in the "Basic Information" section on the data set metadata entry screen (see below). If your data set is not associated with a project, select "No Associated Project" from the drop-down menu. tDAR will associate your data set with your personal information resources.
If you choose to use the project toolbar to create a data set, tDAR will automatically select the associated project (see below).
Entering MetaData for Your Resource
To create a data set (or other digital resource) in tDAR, you will complete two steps:
- enter available metadata, which identifies your dataset (or other digital resource) and that describes it to other users
- upload the file(s)
The "Register a New Dataset with tDAR" page will guide you through the metadata entry and file upload process.
You will begin entering metadata in the "Basic Information" entry section.
Basic Information
Basic information for a data set includes the name of the associated project, the status of the data set metadata, the title of the data set, the associated language, the year the data set was created, and an abstract/description of the data set.
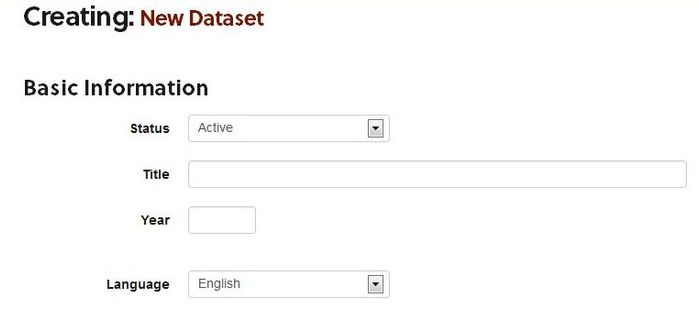
Choosing a Data Set Status
In the "Status" field, select the status (either "active" or "draft") that describes the state of this information resource. Select "active" to indicate that metadata entry is complete and that the resource is ready to be published once it is submittted. The status "active" means that the data set metadata is visible to all users through searching and browsing.
Select "draft" to indicate that metadata is NOT complete and that the resource is NOT ready to be published. Use the "draft" status to save your work (remember to click the submit button at the bottom of the data set entry page, though, to save your metadata in tDAR).
Note: Status does not inherit from a project to resources inside that project. Thus, a project may be marked as a "draft" or even "deleted" without effecting any of the resources within it.
Selecting the Primary Language
The "Language" field records the primary language of text fields in your data set. Select the language from the drop-down list. Language options include English, Spanish, French, German, Dutch, Multiple, Chinese, Cherokee, and Turkish.
Entering the Year
The "Year" field documents the year in which this data set was created and/or "published" in its current state. Use the textbox to enter the year your data set was created.
Selecting an Associated Project
In the "Project" field, use the drop-down box to select the project with which the data set is associated. If you used the project toolbar "add new resource to project" button to create the data set, the project is already selected for you (see description of creating a data set above).

If your data set is not associated with a project, select "No Associated Project" from the drop-down menu. tDAR will associate your data set with your personal information resources.
When you associate a data set with a project, you are accomplishing two things in tDAR:
- displaying the resource on the project page
- enabling "inheritance" of metadata values from the project down to the resource
- you will see checkboxes throughout the data set entry page that enable you to inherit values from the project level
For more information on inheritance, please see the section "Inheriting Project Metadata" on the "Creating or Editing a Project" page.
Adding an Abstract/Description
This text field allows you to provide a narrative about the content of the data set. You will likely want to describe the research that guided the construction of the data set, some of the primary variables and variable states, the use and/or potential uses of the data set, and any important information that users may need to know to apply your data. Use the textbox provided to enter an abstract.

Uploading a Data Set
After entering the general information, you should then select the file(s) you wish to upload to tDAR. You will see a list of accepted file types listed below the file upload box.
Click on the "Browse" button and browse to the file you wish to upload.
If you wish to upload more than one file, click on the "add another file" button that appears after your first file has been uploaded. Then, click on the new "Browse" button and browse to the other file you wish to upload.
Restricting Access to Files: Marking a File as Confidential and Marking a File as Embargoed
tDAR provides two different ways to restrict access to files you upload to tdar:
- mark the file as containing confidential information
- mark the file as an embargoed resource
Marking a File as Confidential
When you mark a file as containing confidential information, the file itself will never be accessible to the public. The file's metadata remains visible, but the file itself is not visible and cannot be downloaded (unless you give access rights to a specific tDAR user).
To mark a file as confidential, select "Confidential" from the drop down menu with the sub-heading "This item has access restrictions".
Why would I mark a resource as "Confidential"? You may choose to mark a resource as confidential if you feel that it contains sensitive data that could endanger an archaeological resource, information that affiliated communities or other interested communities might not wish to be widely available, or information that you are not prepared to share. For example, you may choose to mark a data set that contains mortuary feature data as confidential to respect the wishes of affiliated communities to restrict access to this information. This data should likely remain restricted to professional bioarchaeologists and others who will treat the information with proper respect.
Marking a File as an Embargoed Resource
When you mark a file as embargoed, you are restricting access to the file for 5 years. In other words, the file will not be accessible to the public for the next 5 years. The file's metadata will be visible during that period, but the file itself is not visible and cannot be downloaded. After the embargo period has ended, the file will become accessible to the public.
To mark a file as embargoed, select "Embargoed from the drop down menu with the sub-heading "This item has access restrictions".
Why would I mark a resource as "Embargoed"? You may choose to mark a file as embargoed to restrict access to the resource for a limited period of time. For example, you may wish to register a data set with tDAR that houses data for an ongoing research project. You would like to store the data and share it with a select group of colleagues working with you on the research project. However, this data must remain restricted until the project is complete and results are published in some fashion. You can mark this resource as embargoed to indicate that it is restricted for a period of time before it can be made available to the public.
How do I allow certain users to view my confidential / embargoed resource?
To permit other registered tDAR users to download confidential/embargoed files, you must enter their names into the "Access Rights" fields at the bottom of the data set entry page. You can grant ONLY registered tDAR users the access rights to download these files.
See the "Access Rights" section below.
Adding Data Set Creators
The "Dataset Creator" data entry section asks you to list the persons who contributed to the construction of the data set you are uploading to tDAR. A person who contributed to the creation of the data set may have served as an analyst, data entry technician, data collector/aggregator, data set designer, etc.
Begin entering the name of a data set creator in one of the name fields in the "Person" data entry section. tDAR will make suggestions from a list of tDAR users and other entered persons (i.e., other creators, authors, editors, etc.). If one of the suggested persons matches the person you wish to identify as a data set creator, select that person. If the suggested persons do not include the person you want to identify, then enter that person's name, email address, and institutional affiliation as accurately as possible. Enter a current email address and institutional affiliation ONLY if you are confident it is accurate.
To add additional data set creators, click on the "add another" button. Enter the appropriate information for that person and select the appropriate role.
In some cases, an individual person may not be credited with data set creation. Rather, an institution may be identified as creator of the data set. To add an institution as a data set creator, click on the "add another" button and select "Institution".

Adding Dataset Specific or Agency Identifiers
Dataset Specific or Agency Identifiers in tDAR can include a wide range of values:
- contract numbers
- internal project numbers
- permit numbers
- etc.
. 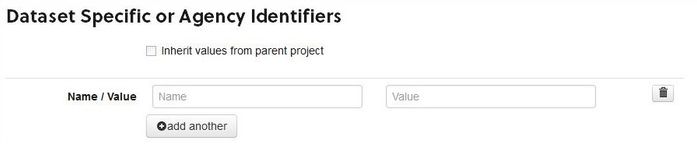
To enter an identifier
- click in the "Name" field
- begin typing the identifier name. For example: "State of California Contract Number", "BLM Permit Number"
- many fields within tDAR include auto-complete, so tDAR may suggest existing values that match what you've typed
- if an existing value matches, select it
- enter the identifier value in the "value" text box
Authorizing Institution | |
|---|---|
| Begin typing the authorizing institution into the "Institution" field. Options already in tDAR will appear in the drop-down list. Select the one that matches the one you want to enter. If it is not available, complete the institution's name and select the "(Create new institution: name)" option. |
What is the Authorizing Institution?
The "Institution Authorizing Upload of this Document" section records the institution that "owns" the resource (i.e., sponsored the production or publication of the document) and/or that gave you permission to upload the resource to tDAR. For example, if the Bureau of Land Management (BLM) sponsored a report and they provided you permission to upload that report to tDAR, the BLM should be entered in the "Institution Authorizing Upload of this Document" section.
Individual & Institutional Credit | |
|---|---|
Begin typing the information of individual being credited into any of the available fields. Options already in tDAR will appear in the drop-down list. Select the one that matches the one you want to enter. If it is not available, complete the person's name and current information Select the role that this person played in your project (e.g., Contact). |
|
To assign institutional roles, select "Institution" .Begin entering text in the "Institution Name" field to obtain a drop-down list of institutions currently entered into tDAR. Select the institution that matches the one you would like to enter. If you do not find that institution in the drop-down list, enter the full name manually. Select the role that this institution played in your project (e.g., Contact). |  |
| To add additional persons and/or institutions, click on the "add another" button. If a person or an institution played more than one role in your project, you will need to a separate record for that person or institution to record that role. | |

Individual & Institutional Credit
Individual and institutional credit fields allow you to record the roles that various people and institutions played in the creation of your resource.
The "Person" field captures the names, contact information, and roles of the different people that contributed to your resource.
The "Institution" field captures the names and roles of institutions that contributed to your project.
Keeping Contact Information Current
It is best to input current the email address and current institutional affiliation as accurately as you can. If you are unsure of a person's email address and their current institutional affiliation, please leave those record boxes blank.
Adding Identifiers | |
|---|---|
Begin typing the information of individual being credited into any of the available fields. Options already in tDAR will appear in the drop-down list. If an existing value matches, select it. If not, enter the name manually. Enter the identifier value in the "Value" field. Choose whether or not you want identifiers inherited from the parent project. For more information on inheritance, please the section on "Inheriting Values" above. | 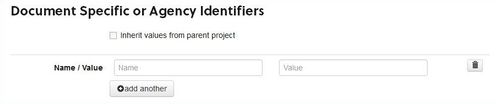 |
What is an Identifier?
Identifiers in tDAR can include a wide range of values:
- contract numbers
- internal project numbers
- permit numbers
- Accession Number
- TNF Project Code
Identifier "Name" will include the type of identifier, for example "State of California Contract Number" or "BLM Permit Number".
"Value" will be the number or code for that Identifier, for example 2011.045.335 or AZ-123-45-10.
Spatial Terms | |
|---|---|
Choose whether or not you want spatial terms inherited from the parent project. For more information on inheritance, please the section on "Inheriting Values" above. Enter as many or as few geographic terms as you would like to describe your resource. Use the "add another keyword" box to add additional terms. Use the trashcan icon to delete a term that you entered in error or that you would like to remove.
| 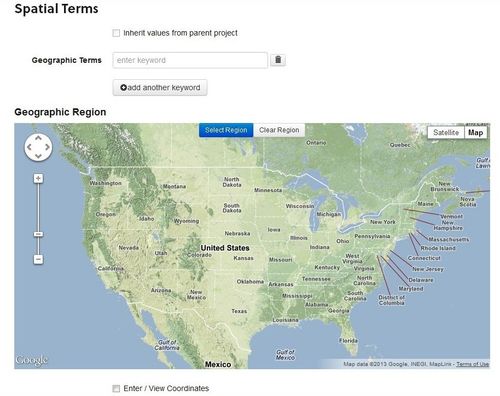 |
Bounding BoxUse the Google Map display to navigate to your site location. Click the "Select Region" button. Craw a box that best approximates the area that your project investigated, or the area that is associated with your resource. If you draw a project location box that is 1 square mile or less in area, tDAR will display a wider box to other users to protect your project area/site location. | 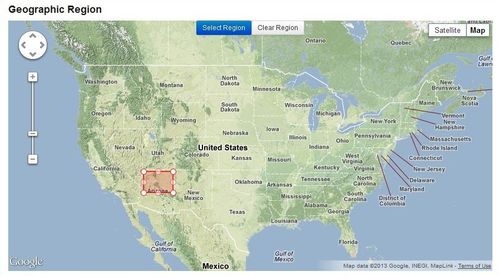 |
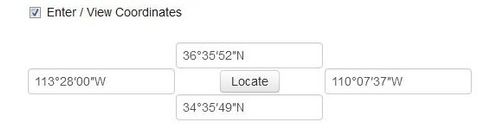
CoordinatesIf you know the exact coordinates of your project or study area, you can enter them manually into tDAR. Click on the checkbox next to "Enter / View Coordinates". Coordinates can be entered in several different formats. For example:
|  |
How tDAR Helps Protect Your Site's Location
Spatial information describes the location of your project area and/or the location associated with a particular project resource (document, image, etc). The spatial information entry section includes two separate components:
- general location keywords, including named regions, geographic features, states, towns, etc.
- a map that allows you to draw a box around your project area
tDAR provides a number of options to protect the exact location of your project area and/or sites. If your bounding box is less than 1 mile square, tDAR will alter that box when it is displayed to users to obfuscate or hide the exact location. Alternately, you may simply draw a wider box.
What if I Entered My Site Location Incorrectly?
Simply click the "Clear Region" button. You may also click on the "Enter / View Coordinates" option and adjust the spatial information manually.
Temporal Coverage | |
|---|---|
Choose whether or not you want temporal coverage inherited from the parent project. For more information on inheritance, please the section on "Inheriting Values" above. Enter as many or as few geographic terms as you would like to describe your resource. Use the "+ add another keyword" box to add additional terms. Use the trashcan icon to delete a term that you entered in error or that you would like to remove. To enter a calendar date range select "Calendar Date" from the "Date Type" drop down menu. Enter a calendar start date and a calendar end date for the sites or other archaeological/cultural resources that your project investigated. Dates Use only numeric values in the calendar date text boxes (Do not enter calendar era designations such as "B.C.E" or "A.D."). To denote a date in the "B.C.E." designation, simply place a " - " before the date's numeric value. Thus, " - 200 " is equivalent to " 200 B. C. E." If a radio carbon date range is available, click on the button "+ add another coverage date" and then select "Radiocarbon Date" from the "Date Type" drop down menu. Enter a start date and an end date for your project's archaeological resources.
| 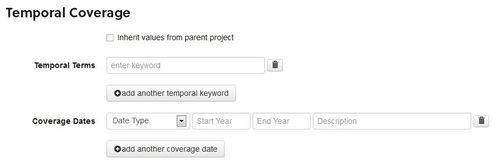 |
What is Temporal Coverage?
Investigation Types | |
|---|---|
Choose whether or not you want investigation types inherited from the parent project. For more information on inheritance, please the section on "Inheriting Values" above. Investigation types describe the various types of activities performed during the creation of your resource. Select as many or as few types that apply.
| 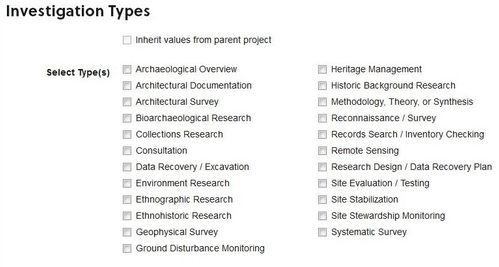 |
Hold your cursor over any of the investigation types to obtain a detailed description of the activities that an investigation type includes.
Material Types | |
|---|---|
Choose whether or not you want the material types inherited from the parent project. For more information on inheritance, please the section on "Inheriting Values" above. The material types section describes the types of materials that were collected, analyzed, or discussed in association with your resource. Select as many or as few that apply to your project.
| 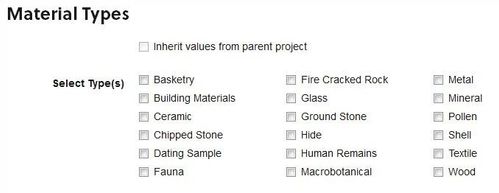 |
What is My Material Type is not Listed?
If a material type you're expecting is not listed above, you have two options:
- enter the material type in the "General Keywords" section
- contact tDAR and ask for it to be added
Cultural Terms | |
|---|---|
Choose whether or not you want cultural terms inherited from the parent project. For more information on inheritance, please the section on "Inheriting Values" above. Click on the " + " box next to a cultural term to open a list of more specific cultural terms.
| 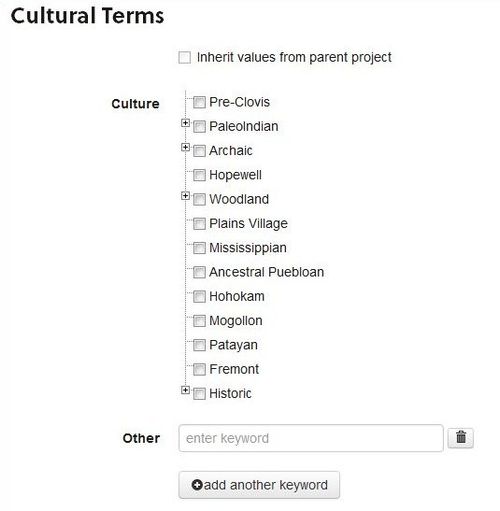 |
What are Cultural Terms?
Cultural terms describe the archaeological cultures and/or historic population groups who are affiliated with the cultural resources described, presented, or displayed in your resource. Select as many or as few cultural terms as you would like to describe the groups of people affiliated with this resource.
Within tDAR, cultural terms can be specific or general. tDAR will mark specific cultural terms with their generalized equivalents (e.g., "Early Woodland" is also marked as "Woodland"). Thus, if you select the specific cultural term "Early Woodland", your record will also be found by a user who searches for the more general term "Woodland".
What if the Cultural Term I want is not Listed?
If a cultural term you'd like to use is not listed, please add it to the "Other" section at the bottom of the cultural terms section. Data curators review these terms regularly and update the list of cultural terms to reflect commonly entered values.
Site Information | |
|---|---|
Choose whether or not you want the site information inherited from the parent project. For more information on inheritance, please the section on "Inheriting Values" above. Select the "Site Type" descriptors that best describe the archaeological/cultural resources that occur at the sites you listed in the "Site Name" text boxes. Click on the " + " box next to a site type to open a more detailed list of descriptions for that particular site type. Select all the type descriptions that apply to the the sites you listed above in the "Site Name" text boxes. |  |
Site Information
The site information section includes the names of the sites associated with your resource and a summary of the types of archaeological resources found at those sites.
Enter as many or as few site names as you would like to describe the work completed in the creation of your resource. Use the "add another keyword" to add more sites. Click the trashcan icon to delete site names that you entered in error or that you no longer want to associate with the project.
General Keywords | |
|---|---|
General keywords allow you to add any additional terms that are not included in the other resource metadata. This may include specific types of investigations undertaken as part of resource creation (e.g., "material sourcing","ceramic petrography","experimental archaeology"), specific site types ("rock gardens", "ground stone production area","shrine"), etc. Enter these keywords into the text box provided. If you decide to enter additional keywords, enter succinct keyword terms that accurately describe your project. Also, enter succinct terms that researchers in your area use commonly. Choose whether or not you want general keywords inherited from the parent project. For more information on inheritance, please the section on "Inheriting Values" above. | 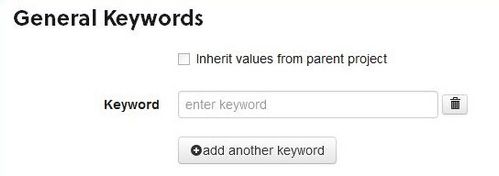 |
Resource Notes | |
|---|---|
The resource notes field allows you to enter any additional information about your resource that is not captured in the resource metadata fields. This field acts as a comments section, where you can enter a small narrative that might help other users better understand some important aspect of the resource you are uploading to tDAR. Select the type of note you wish to create from the "Type" drop-down box. Enter your note in the text field provided. Choose whether or not you want any notes inherited from the parent project. For more information on inheritance, please the section on "Inheriting Values" above. | 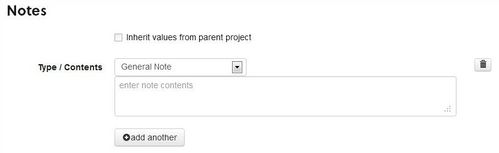 |
Access Rights | |
|---|---|
At the resource (e.g., document) level, access rights allow you (the project creator) to specify two kinds of users:
Note that access rights allow you to control ONLY who can EDIT the resource metadata and who can VIEW and DOWNLOAD the resource file. Access rights do NOT allow you to control who can view the resource metadata. To specify read-only users, select "View All" from the drop down menu to the right. Enter the names of persons who have the right to view and download resource files. You can grant these rights ONLY to registered tDAR users. When you begin to type in any of the text boxes provided, tDAR will provide suggestions to you from among its registered users. Select the tDAR user(s) that have the right to download attached files. To specify metadata only users, select "Modify Metadata" from the drop down menu to the right. Enter the names of the persons who have the right to edit resource metadata only. You can grant access rights ONLY to registered tDAR users. When you begin to type in any of the text boxes provided, tDAR will provide suggestions to you from among its registered users. Select the tDAR user(s) that have the right to edit this resource. To specify full-right's users, select "Modify Files & Metadata" from the drop down menu to the right. Enter the names of persons who have the right to edit resource metadata and manage/download resource files. You can grant access rights ONLY to registered tDAR users.
Why don't I see the "Users who can view/download the attached file(s)" section?This access rights section is only visible when you mark a resource as confidential or as embargoed. If you did not mark your resource as confidential or as embargoed, then your resource file(s) are available to all tDAR users. You cannot control the access rights to the file(s). You will need to mark these resources as confidential or embargoed if you would like to control access. | 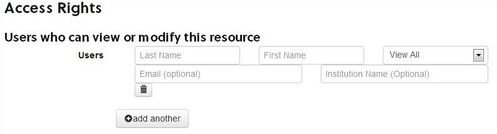 |
Done? Time to Save | |
|---|---|
| Once you've completed your resource entry, click the "Save" button at the bottom of the project page or on the toolbar at the top of the page to save your metadata. | |
 | |