Working With 3D Sensory Data Objects
What is a 3D Sensory Dataset?
3D sensory datasets are data and derived products that have been produced from 3D terrestrial or object-based scanners. 3D scanning often referred to as laser scanning is the process of recording precise three dimensional information of a real world object or environment. The information is stored as a dense collection of precisely measured XYZ coordinates referred to as a point cloud. These files often contain additional intensity (I) and/or color information (RGB). Point clouds contain a wealth of information on their own and they can also be processed to produce additional products such as polygonal meshes, 2D and 3D CAD files, digital elevation models, and more.
The 3D sensory datasets that have been archived with tDAR have been archived according to the Guides to Good Practice for Laser Scanning in Archeology http://guides.archaeologydataservice.ac.uk/g2gp/LaserScan_Toc. This guide includes recommended metadata for the collection, processing, and archival of scan data. These metadata have been translated to an online entry form on the tDAR website and also to three database templates (in Excel format) that can be downloaded by the online user as part of the data ingest process to tDAR. The online entry form contains project level metadata and the individual templates contain metadata for the collection and processing of the scan data. The database templates have been created based on scan technology which include time-of-flight, phase-shift, and triangulation scanning. Each template includes metadata suggestions for the original raw scan files, a registered dataset, and a merged polygonal mesh (if created). Note, additional derived products are currently not accepted in tDAR. For more information on the difference types of scan technology, please reference the Guides to Good Practice.
Downloading 3D Sensory Data from tDAR
When you download a 3D sensory dataset from tDAR, it will be a ZIP file that should contain at a minimum: original scan files, a registered point cloud or mesh, and the database template with accompanying metadata. Transformation matrices may also be included with the individual scans. These matrices contain the information that is used to transform an individual scan into the coordinate system of the final registered dataset. Additional products such as a merged polygonal mesh and/or a decimated mesh may also be included.
Depending on the type of technology used on a project, original scan files can be archived as either point clouds or polygonal meshes. It is generally recommended to archive terrestrial time-of-flight or phase-shift scans in E57 or ASCII text format. The ASTM E57 format is an emerging open standard, vendor neutral format that is ideal for terrestrial datasets because it retains original scan organization including grid information, scanner location, and coordinate system transformations. While more vendors are offering support for the E57 format, it is still yet to be accepted as a common exchange format. ASCII text files may be used in projects where E57 export is not available.
Object scans that are acquired with triangulation systems can either be archived as polygonal meshes in an OBJ or X3D formats or point clouds in an ASCII text format. Software used to acquire triangulation scans will often create a polygonal mesh for each scan directly upon import and it can often be difficult to extract the original point cloud acquired by the scanner. Therefore, object scans can be archived as either meshes or point clouds.
A registered dataset can either be a point cloud or mesh file and is the result of combining or co-registering all scans from a project into a single coordinate system. The registered dataset represents all of the data collected for a specific object, structure or survey area prior to any advanced editing. When opening datasets from a scan project, users may wish to open individual scans to view a specific portion or subset of an object or the final registered dataset which will show the object/environment as a whole.
A polygonal mesh is created by connecting vertices within a point cloud to create multiple faces or polygons that together form a triangulated surface model. Polygonal meshes can be created at various points in a processing workflow however a merged polygonal mesh is created specifically from either a registered point cloud or mesh and typically uses advanced algorithms to account for overlapping data to choose or create the most representative surface. Once a merged mesh is created from a registered dataset, it typically undergoes additional post processing such as hole filling, data healing, smoothing, color correction, and in some cases decimation to optimize the appearance of the final mesh product. The degree of post processing on a mesh should be included with the metadata for the mesh object.
Opening Point Clouds (E57 and TXT) and Polygonal Meshes (OBJ) using Free Downloadable Software
While more point cloud processing software and point cloud supported plugins are becoming available, point clouds are still not as widely supported as polygonal meshes. Polygonal meshes in the standard OBJ format can be imported into most 3D modeling software such as 3DStudio Max, SoftImage, Cinema 4D, Maya, Blender, and others. However, these software may not be equipped to handle high polygon counts that are commonly associated with mesh files produced from point cloud data. Therefore, polygonal meshes will often need to be decimated or reduced in order to be imported successfully into most standard 3D modeling packages.
Most proprietary software used to process 3D scan data (including Cyclone, Polyworks , Geomagic, and others) provide free data viewers that are able to view and manipulate high resolution polygonal meshes and point clouds. More open source point cloud processing solutions (such as MeshLab and Cloud Compare) are also becoming available. The emphasis here is to provide a brief assessment of what free software is currently available and can open specifically the point cloud and mesh file types that have been archived. Most of the software listed here are data viewers meant strictly to open, view and manipulate 3D data; however some of the open source solutions may offer more advanced processing or analytical operations (which will not be discussed here). This is not a comprehensive software list nor is this list a how-to document for using each of the software; it is meant to serve only as a guide to opening and viewing point cloud and mesh files that have been archived with tDAR.
Cloud Compare http://www.danielgm.net/cc/
Cloud compare is an open source point cloud processing software. It was originally designed for comparison between point clouds (or between a point cloud and mesh) and has been extended to include more advanced processing operations such as registration, resampling, segmentation and more. Cloud Compare can open E57, ASCII TXT point cloud files, and OBJ files. As a data viewer, it offers an advanced display options for viewing point clouds and meshes through its PCV Plugin which calculates ambient occlusion on a point cloud. Users can also open individual scans and perform scan-to-scan registration and additional advanced processing if desired. Cloud Compare is also commonly used to convert datasets into different formats. For example, Cloud Compare can open E57 files and export them to an ASCII TXT format, which can be opened by more software packages.
AutoDesk ReCap Pro http://www.autodesk.com/products/recap/overview
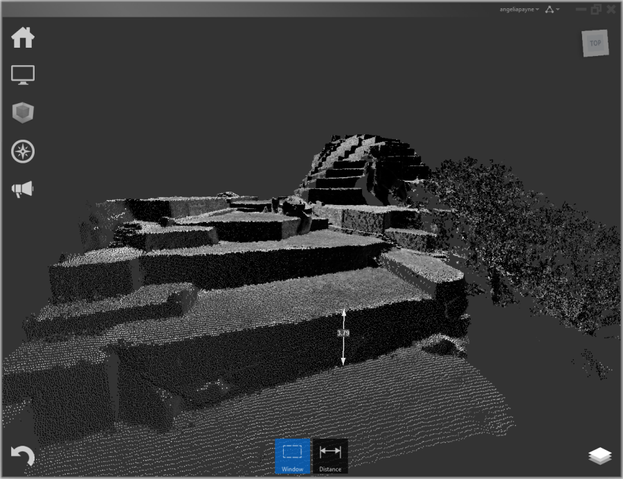
ReCap Pro is a point cloud processing software that is currently offered as a free limited-time trial from Autodesk. It is not clear whether it will or will no continue to be free in the future. It can open both E57 and TXT point cloud files and offers more advanced processing operations such as target-less registration and advanced data editing. Basic distance and angle measurements as well as annotation capabilities are also provided. Users can open individual scan files or an entire registered point cloud and compute basic distance measurements as shown below.
Recap Pro also offers some enhanced display options for viewing point clouds including different lighting and shading algorithms that can be very useful for enhancing characteristics of the point cloud dataset. Note, the edge highlighting display is being used in the screen capture above. The program is streamlined and efficient with all functionality accessible from a simple menu system that lines the left side of the screen.
Geomagic Verify Viewer (formerly Rapidform Explorer) http://www.rapidform.com/products/xov/explorer-free-viewer/
Geomagic Verify Viewer (formerly Rapidform Explorer) is free viewing software that is similar to Geomagic Verify (formerly Rapidform XOV) but with reduced functionality. Verify Viewer can open both ASCII TXT point clouds and OBJ mesh files. It offers distance and angle measurement capabilities as well as area and volume calculations for polygonal mesh models. The user can also adjust the lighting controls and an objects texture/material properties (see image below). For more comprehensive instructions of how to open an OBJ mesh file in Geomagic Verify Viewer and perform basic measurements, see the Using Geomagic Verify Viewer document (link).
Meshlab
Meshlab is an open source software for processing and editing point cloud and mesh datasets. More advanced processing operations in Meshlab include scan-to-scan registration, mesh creation, mesh editing, cleaning, healing, and inspection. Users can open both ASCII TXT files and OBJ polygonal mesh files in Meshlab. Basic measurement capabilities are also provided.
Using Geomagic Verify Viewer – Open your dataset
To open a dataset in Verify Viewer, first launch the software and go to File – Open. Next, select the dataset that you wish to open. Note that only one dataset can be viewed at a time. Upon opening a dataset, the user will be prompted to specify the measurement units for the incoming objects. Data acquired with the Breuckmann SmartScan HE and Konica Minolta VIVID 9i will be in millimeters, while data collected with the Optech ILRIS-3D, Leica C10, and Z+F Imager 50061 will be in meters. The scanner information and measurement units will be provided in the project metadata on tDAR.
If you are importing an ASCII TXT file you may be asked to convert the file manually. If prompted to do so, click yes. Next, a dialog box will appear that will require you to assign column headers to each column of values. Geomagic usually does a pretty good job of guessing what is in each column although you should verify that it is correct before pressing continue. ASCII data is typically in one of the following formats: XYZI, XYZRGB, or XYZRGBI where the first three values will define a point coordinate (X,Y,Z specifies a precise position in 3D space), I defines an intensity value, and RGB defines a color value. You can select the value for each column by selecting the appropriate value from the drop down box at the top of each column.
UPDATE (11/12/2013): Geomagic Verify does not correctly import ASCII point clouds with Intensity information (XYZI). The file will import but intensity cannot be displayed. This error has been reported to Geomagic. Please use Cloud Compare to open ASCII TXT files that use XYZI formatting. This will include all Optech point cloud datasets.
Learn how to view/navigate around the object in 3D space
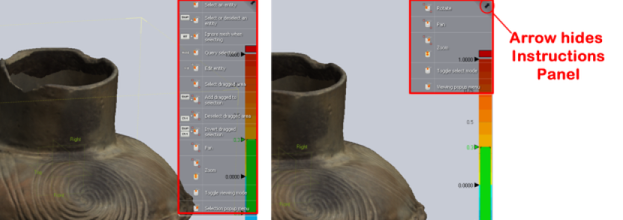
When a dataset is initially loaded into Verify Viewer, the default manipulation mode is set to "selection" which is indicated by the crosshair icon. The selection mode allows the user to select items on the screen such as selecting the object or picking points/vertices for measurement or selecting a reference plane. To toggle between selection and navigation mode, tap the middle mouse button. Note that the crosshair icon indicates selection mode and the chasing arrows icon indicates navigation mode. Also notice that there is a gray transparent box with instructions in the top right of the viewing window that changes when you switch between the different modes. This box is useful when you are familiarizing yourself with the software and can easily be hidden by clicking on the black arrow at the top right.
Figure 1: Instruction panel for Selection Mode (left) and Navigation Mode (right)
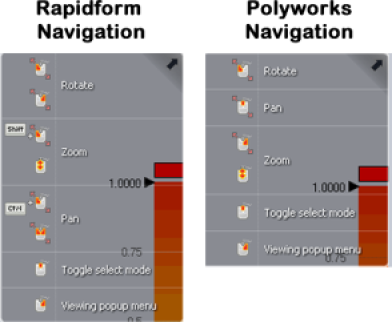
Once in Navigation mode, the user can rotate and view the object from different angles. The View Manipulation Style can be changed based on user software preference by selecting File - Preferences. The default view manipulation mode is set to Rapidform. We generally advise to use the Polyworks view mode instead as it assigns a function to each mouse button (left, middle, right) and does not require the use of the Ctrl or Shift buttons. Use a navigation mode that is most comfortable to you. A comparison between the Rapidform and Polyworks view modes can be seen in Figure 2 below.
Figure 2: Comparison of Rapidform and Polyworks View Manipulation styles.
Adjusting the Display Options in Geomagic Verify Viewer
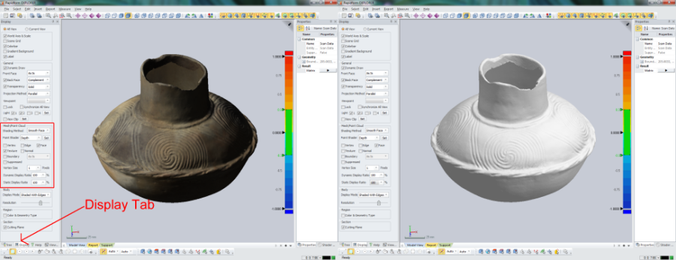
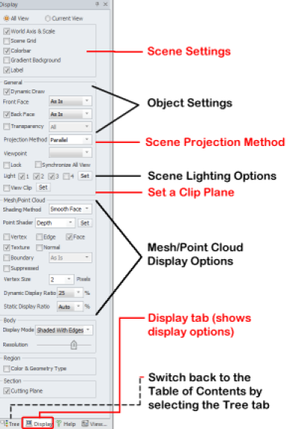
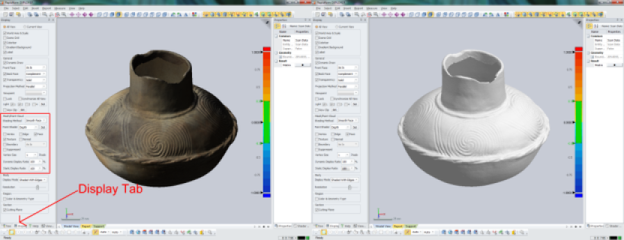
Once a dataset is open, there are several display options that can be adjusted. To turn off the green reference planes located at the object's origin, toggle the eye icon next to Ref. planes under Reference in the Table of Contents on the left side of the screen. Also, if you click on the Display tab near the bottom left of the screen, you can change any of the options listed under the Mesh/Point Cloud dialog.
Figure 3: Display options for Geomagic Verify Viewer
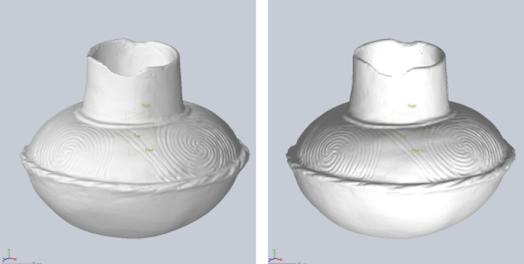
Of these, toggling the Texture off and on can be useful particularly when viewing a mesh data set as it allows you to better view the underlying surface topography on an object as shown in Figure 3 below.
Figure 4: Toggling the texture on (above left) and off (above right) for an object
Also subsampling the static and/or dynamic display ratio can be beneficial on computers that might have limited graphics and/or RAM capabilities. Feel free to explore the different display options that are available.
To adjust the lighting of the scene, you can toggle the number of lights or hit the Set button located just above the Mesh/Point Cloud options in the Display tab. Optionally, you can also go to View – Light Properties. Here the user can adjust the direction and hue of different light sources which can be good for accentuating features on an object. Note: Only mesh datasets are affected by scene lighting adjustments.
Figure 5: Object shown with different lighting (adjusted by changing the lighting options)
Computing Measurements on an Object
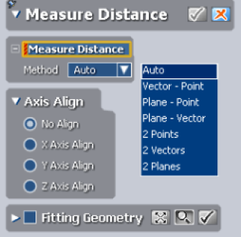
Under the Measure menu, there are several different measurement options available for analyzing an object. The first measurement option, the distance measurement, is the most common. For distance measurements, the user has several alternatives including basic point-to-point (2-points) measurement as well as others shown in Figure 6 below.
Figure 6: Measure Distance - Method options
For a basic point-to-point measurement, choose the "2 Points" option under Method. Next, you can choose to constrain the measurement to a specific axis. For example, one may wish to constrain a measurement to the Y axis to acquire a vertical measurement for an object.
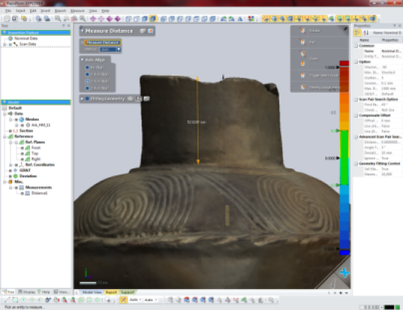
Once you have selected the appropriate method and constraint options, tap the middle mouse button to enter selection mode and then choose two points on the object. A point-to-point distance measurement is computed and is stored under the Measurements entry in the table of contents on the left side of the screen. Once the user exits the Measurement dialog, all measurements are available in the table of contents.
Figure 7: A point-to-point measurement constrained to the Y axis
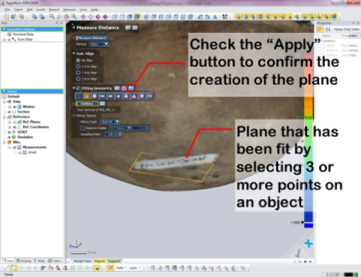
If you would like measure the distance between planes, vectors, or other primitives you will first have to fit those primitives to the object. To do so, turn on the Fitting Geometry option under the Measure Distance dialog. Next choose the desired primitive to fit to the object. In this example, we will fit a plane to the base of the vessel. Select plane and enter Selection Mode by tapping your middle mouse button. Select points on the base of the vessel that will be used to draw the plane. Once you have identified enough points to create the desired primitive object (3 in this case to make a plane), the primitive feature will appear in orange. Note: you can continue selecting points to adjust the primitive geometry. Once you have fit your primitive, make sure you hit the blue check "Apply button" next to the "Fitting Geometry" text to confirm the creation of the primitive.
Figure 8: Fit a plane to the object and check the Apply button to complete the process
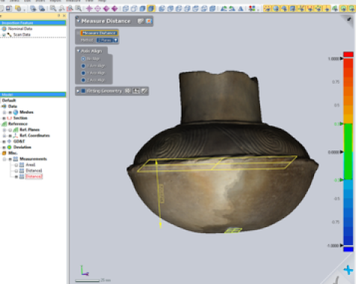
Once the desired primitives are created, uncheck the Fitting Geometry option, specify the desired measurement method, and then pick the two primitives onscreen that you wish to measure between and a distance measurement will be computed.
Figure 9: A plane to plane measurement in Geomagic Verify Viewer
There are several other measurement tools available under the Measure menu including angle, radius, section, volume, area, and virtual calipers. To learn more about how to use a given tool, select the tool and tap F1 on your keyboard to access Viewer's context-based help menu. The help menu is very useful for learning about the different measurement options in Verify Viewer.
